Cabinetmaker's Cake
Gâteau Ébéniste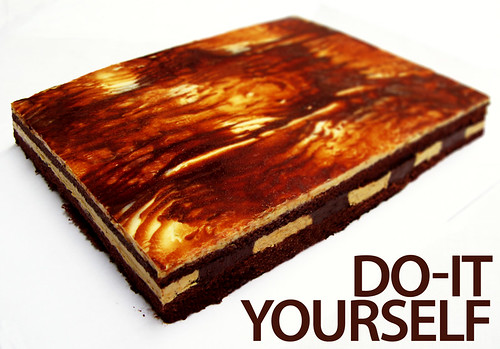
Not many of my friends know (or have guessed) this about me, but I seriously enjoy going to the hardware shop. I don't know if it's genetic but my dad is kind of a contractor and it's always a regular stop whenever we're in the area. I do like perusing hundreds of electrical and audio/video adapters, just to see what can happen if you connect an ipod to a computer and to a karaoke microphone. But the latest trip has been significant for reasons of food. Since I bought Bruce Healy and Paul Bugat's The Art of the Cake, I've wanted to make the Ébéniste ("Cabinetmaker"), because is looks like the perfect marriage of elegant and over-the-top, which I realize is a paradox. Maybe it has something to do with the fact that it harkens to the '70s, when faux-wood finishes were all the rage. Plus, no one in the internet world has posted about it before, which is as good a reason as any to make one (of course, the best reason is that it is my brother's birthday, and you gotta have cake, diet or no). I needed a wood-graining tool (PhP270 or $6.45 at ACE Hardware), which needs a little practice, but is a lot of fun to use. While I was at it, I bought a butane torch (PhP500 or $12) for future use.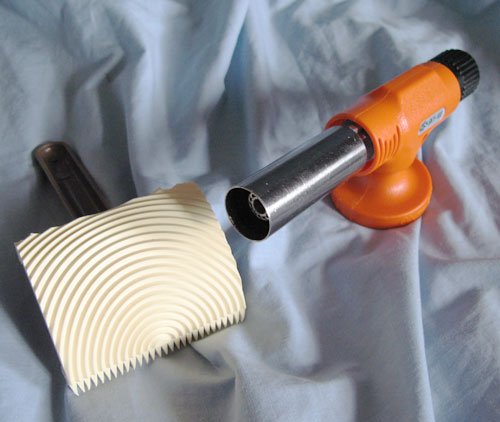
The verdict? It not only looks elegant, but tastes elegant too. Not too sweet (though the calories are there, folks), and looks amazing. Totally worth all the trouble I went through tempering that damn chocolate (see story in previous post). I am outlining the recipe below, with a few steps altered based on my research and for economical purposes.
Ébéniste adapted from Bruce Healy and Paul Bugat's The Art of the Cake
Chocolate Génoise Sheet
- 4 large eggs, at room temperature
- 1 large egg yolk, at room temperature
- 125g (1/2 cup + 2 tablespoons) granulated sugar
- 85g (1/2 cup + 2 tablespoons) all-purpose flour
- 5g (1-1/2 teaspoons) potato starch (I used cornstarch)
- 25g (1/4 cup) Dutch-processed cocoa powder (I used Valrhona)
- 15g (1 tablespoon) unsalted butter, melted
Prepare a 12x16 inch sheet pan: grease the pan, line with parchment (specially cut to go neatly up the sides of the sheet pan), and grease the parchment. I used baking spray (indispensable at this rate), but you can use melted clarified butter. Preheat the oven to 190°C (375°F). Sift the flour, starch, and cocoa over a piece of wax paper. Combine the eggs, egg yolk, and sugar in a stainless steel mixing bowl, breaking all the yolks. Beat until smooth. Set over a pan filled with simmering water (I just used hot tap water-- an easier job if the eggs are already at room temperature) and beat until warm (40°C or 100°F), frothy, and it no longer feel grainy when rubbed between the your fingers. Take off the hot water and beat at high speed until tripled in volume, thick, pale, and falls in very slowly dissolving ribbons when the beater is lifted. Sprinkle about a third of the flour mixture on top and gently but thoroughly fold it in until incorporated. Repeat twice more until all the flour is used up. Take a cup of the batter and fold it into the melted butter, then return the melted butter mixture to the batter and fold it in until thoroughly combined. Scoop into the prepared pan and smooth with a large spatula so that it is uniformly 3/8 inch thick. Bake until the top is firm but not crusty, about 6 to 10 minutes. Slide the baked genoise onto a cooling rack until only slightly warm, then place another rack on top and flip over. Remove the parchment and replace it sticky side-up, put the first rack back on and flip the genoise right-side up. Remove the second cooling rack and allow the cake to cool completely. Use the cake the same day as it is prepared.
Ganache Clichy
- 145g (5.1 oz)bittersweet chocolate, coarsely chopped
- 120g (1/2 cup) heavy cream
Bring the cream to a boil in the microwave or in a heavy-bottomed saucepan. Pour over the chocolate and stir gently until all the chocolate is melted. Once cool, this can be covered and refrigerated for 1 week or frozen for 3 months. However, bring it back to room temperature before using.
Coffee Buttercream - this recipe is particularly nice because it doesn't mess with sugar syrups, is perfectly safe for all as it has no raw egg yolks, and won't curdle as there is no water in it.
- 3 large egg yolks
- 19g (0.7oz) espresso beans
- 90g (6 tablespoons) milk + additional just in case
- 112 g (1/2 cup + 1 tablespoon) granulated sugar
- 225g (2 sticks or 1 cup) unsalted butter, at room temperature
In a mortar and pestle, crush the beans until you are left with big fragments, taking care not to grind them to dust (work in small batches to avoid this). Bring the milk to a boil in the microwave or in a heavy-bottomed saucepan. Take off the heat and place the espresso fragments in the milk to steep for 10 minutes. Strain into another bowl pressing on the beans to extract as much milk as possible, and add enough milk to the resulting liquid to make 67g (1/4 cup), as the beans might absorb a lot of the milk. Clean out the strainer for later. In a heavy-bottomed saucepan, whisk together the egg yolks and the sugar until well-combined and pale. Drizzle in a quarter of the milk, whisking madly all the while, then pour in the rest of the milk and whisk together. Place the saucepan over medium heat and bring to a boil, whisking constantly, and boil for a minute. Strain into a large bowl. Beat the custard until light and cool. With the mixer on high speed, beat in the butter, 2 tablespoons at a time, into the custard until light and voluminous. This can now be used right away, or covered in the refrigerator for a week or frozen for a month. Bring back to room temperature before using, and beat until it regains its light texture.
Heavy Syrup
- 115g (1 cup + 1 tablespoon) granulated sugar
- 70g (1/3 cup) water
In a heavy-bottomed saucepan, combine the two ingredients and bring to a boil over high heat, swirling the pan to dissolve all the sugar. Once it boils, take off the heat. Once cool, this syrup can be stored in the refrigerator.
Writing Chocolate
- 30g (1 ounce) unsweetened chocolate, melted
- 30mL (2 tablespoons) heavy syrup, heated to lukewarm
Stir in the heavy syrup a little at a time into the chocolate. Halfway through adding the heavy syrup, the chocolate might become grainy and seize, but keep adding the rest of the 2 tablespoons and it will become satiny again.
Coffee Syrup
- 90mL (1/4 cup + 2 tablespoons) double-strength brewed espresso
- 90mL (1/4 cup + 2 tablespoons) heavy syrup
Mix the two together in a small bowl until well-combined.
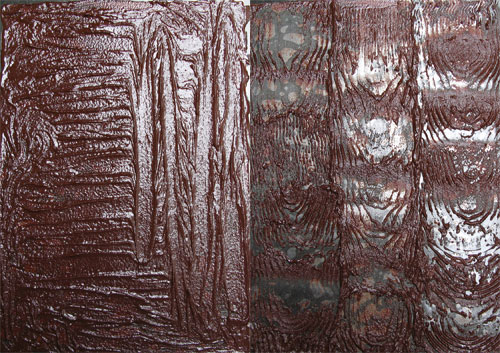
Making the wood-grain coat:
You're going to assemble this cake upside-down. You will need a sheet of (clean!) clear polyester or acetate slightly larger than half of the génoise sheet (an A4 size was perfect for the job). On a sheet pan large enough to accommodate the acetate sheet, dab a little bit of the writing chocolate under the corners of the acetate to hold it in place onto the sheet pan. Spread the rest of the writing chocolate in a thin and even layer over the acetate. Using the wood-grain tool, drag it from top to bottom (short side to short side), rocking the tool while dragging, to create a realistic heartwood effect. Go crazy. If you mess up, you can scrape up the writing chocolate, spread it on again, and start again. Leave in the refrigerator to set.
115g (4oz) European white chocolate
(Special thanks to Kerry Beal's demo on how to temper chocolate. I've taken a lot of precautions here to avoid errant drops of water-- you do not want a single drop in your chocolate-- and to make it as painless as possible). Prepare a large shallow pan filled with cold water (melt an ice cube in tap water if you want to get it just right), a hair dryer, a dry instant-read or chocolate thermometer and a dry rubber spatula. In the microwave at LOW power (using a pyrex measuring cup) or in a double boiler set over barely simmering water (using a very large heatproof bowl), melt the white chocolate, stirring every now and then, until you see only small chunks remaining. Give it a stir with the spatula to melt the chocolate with the residual heat of the container. Try not to exceed 45°C (113°F). Dip the bottom of the pyrex cup/bowl in the cold water to bring the chocolate's temperature to a range of 25-26.5°C (77-80°F). If the chocolate's temperature is too high, smoosh it up the sides of the bowl (being careful not to let any water touch it, of course) and very quickly amass it towards the center again. Don't rush the cooling because if it drops below 25°C, you'll have to melt the chocolate again. Once it's at the right temperature, take it off the cold water, wiping the bottom of the pyrex cup/bowl with a tea towel so there's no stray water drops around. Smoosh the chocolate up the sides of the bowl and quickly (in just one one-second pass) blast it with hot air from the hair dryer, then amass the chocolate towards the center. Check the temperature-- it should be in the range of 29-30°C (84-86°F). If it's not in this range, smoosh it again and blast it with hot air one more time. It took me two blasts of hot air to get the temperature right. Don't be too generous with the hot air, because if the temperature exceeds 30°C, you'll have to melt the chocolate and start over.
Pour the tempered white chocolate over the wood-grained writing chocolate, then quickly use a large offset spatula to spread it in a thin and even layer. I found that in my tropical climate, that writing chocolate melts very quickly, so it got smeared a little bit while I was spreading the white chocolate. However, it was serendipitous as it gave the white chocolate an occasional light-brown tint, making it look more like wood. In any case, try to spread in the direction of the wood grain so it's not too messed up. Let it cool at room temperature until set but not brittle.
Measure the génoise sheet (remember him?) and cut it crosswise into two equal rectangles.
On the set chocolate, spread a third of the soft coffee buttercream (113g or 2/3 cup) in an even layer. Place a rectangle of génoise on top, spongy-side up, and brush with half of the coffee syrup.
Load the remaining coffee buttercream and the ganache into a medium pastry bag each fitted with a 3/8 inch (1cm) plain decorating tip. Pipe two ropes of coffee buttercream crosswise in the center of the cake side-by-side. Pipe two ropes each of ganache on both sides of the coffee buttercream. Repeat in alternating flavors (every 2 ropes) until you have reached the edges of the cake.
Brush the spongy side of the second génoise rectangle with the remaining coffee syrup and place it spongy side-down on the buttercream and ganache ropes. Place a sheet pan on top and lean into it lightly and evenly to compress the cake and to make it level.
Cut a piece of foil matt board (cake boards are thick and ugly) so that it is 1 inch smaller in both dimensions than the genoise rectangles. Place it on top of the cake. Place a sheet pan on top. Flip the whole set-up over quickly, then remove the original sheet pan (where you placed the acetate originally) carefully, making sure the acetate is still stuck to the chocolate. Refrigerate the cake, acetate and all, for at least an hour.
Carefully peel the acetate from the white chocolate. If you have tempered it properly, you should have no problems removing the acetate. Using a long, sharp, wavy-edged bread knife dipped in boiling water and dried, cut through the whole cake on each of the sides so that the sides are flat and the stripes of buttercream and ganache are showing. Wipe the blade of the knife clean and reheat it with boiling water (and dry of course) in between each cut.
Whew!