Ad Hoc's Banana Bread Pudding
Just quickly: if you want to learn the basics of adjustment layers (which is how I created the selective coloring effect in the image below), just head on over to Special Effects for my lesson on adjustment layers. It's applicable in both Photoshop and Elements.
Well, so much for rushing to post as many pending recipes I have in my cache before I start my first day as a resident. For a brief period after a brief holiday, my internet pretty much exploded (again). But I'm glad to be back and can't wait to read what everyone's been up to (asking that question on Twitter doesn't seem to generate any response!). Today I'm going to be talking about a major turning point in the entire 3-year history of my learning how to bake: the day I decided to buy a digital scale.
I've always thought it was silly that anyone would suggest that some people are not open to using scales because it involves "math". Granted I've never been afraid of maths (in fact I aced it), but dealing with the fractions of cups and spoons involves more math, especially if you have to scale a recipe up or down. The only part that would be prohibitive would be the price, but these are going down all the time even for good models and the time it saves and the joy of reproducing a recipe faithfully is more than worth it.
The day I decided to start using a scale was when I wanted to learn to make bread. Unfortunately I didn't get the techniques of making bread right so that was a bust, but I've been using it ever since-- converting cup-and-spoon recipes and writing them down in my notebook.
Common measuring problems
1. Measuring brown sugar
Cups: Pack the brown sugar down with the back of a spoon without using excessive force.
Scale: Pour it straight from the container into any bowl on the scale.
2. Measuring grated ingredients (fruits, vegetables, cheese)
C: Usually recipes will have an estimate of how many you'll use up (e.g., 2 carrots) and then just grate and depending on the recipe, pack them down (or not at all).
S: Buy as heavy an ingredient as the recipe requires at the market (taking into account extras like trash carrot tops or peel) then just grate the weighed-out ingredient.
3. Measuring viscous ingredients (honey, molasses)
C: You can scrape the liquid out with a spoon, or you can spray the cup with vegetable oil spray before pouring the liquid in (don't do this if you're using it to sweeten a meringue of course).
S: Pour the ingredient into the bowl on the scale.
4. Measuring solid fat (butter, shortening), chocolate, almond paste
C: For butter, wrappers usually have a "ruler" where you can cut the stick (a quarter-pound or half-cup) to give you the required tablespoons. For shortening and almond paste, just make sure it's soft and slop it into the measuring cup. Chocolate comes in pre-measured squares for some brands.
S: Cut off small portions at a time into the bowl on the scale.
5. Measuring hot liquids
C: Always use a transparent measuring jug, as cups might spill and cause injury.
S: Measure into the bowl on the scale. (Which incidentally can also be a transparent measuring jug that you can microwave, or a heatproof bowl, or a saucepan. Though you shouldn't put a saucepan from the stove onto a plastic scale.)
6. Measuring flour
C: The author should tell you how he or she measures flour. Some authors (Flo Braker) spoon it into the cup and level it off. Others (Dorie Greenspan) fluff the flour in the container, then dip and sweep it to level off. If they don't tell you how they measure flour, that's just foul.
S: Pour or spoon the required amount into the bowl on the scale.
7. Measuring sifted flour
C: To minimize waste, place the cup on a clean sheet (like foil or parchment) then sift the flour over the measuring cup until it mounds over the rim and sweep it to level off. Pour the excess from the sheet back into the container.
S: Cookbooks that rely on weight almost never have this instruction, but you can pour or spoon the required weight into the bowl on the scale then sift it as many times as you like.
These are just my views. About the only time the cups win for me is when you are reducing a liquid and need to see what its volume is. (I'd love to have a saucepan with gradations on the inside but...)
Why did I write about this? I recently wrote a review for Ad Hoc at Home and though Thomas Keller wants you to use a scale, he goes on to use volume measurements even for baking recipes, which is just strange. So here's I've written part of what he should have taught his readers.
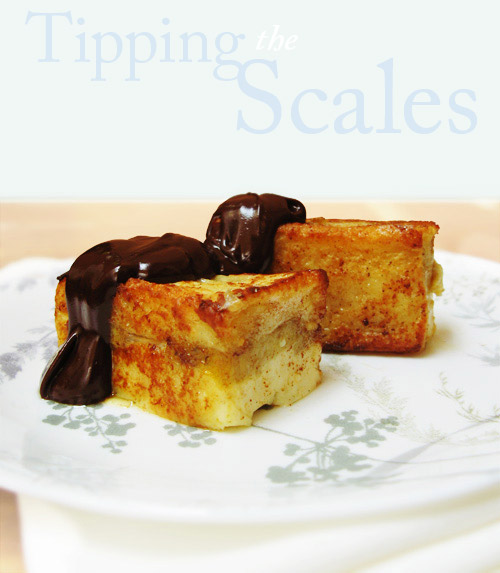
This is a bread pudding with bananas in it, not a pudding made with stale banana bread (though that could be awesome if done right). It's a little bit on the labor-intensive side (it is cooked twice, after all), but the presentation is fab and it tastes wonderful especially with the chocolate sauce (too bad I didn't have ice cream on hand!).
Banana Bread Pudding adapted from Ad Hoc at Home
This was originally written for a 9x13" dish but that's too large for me. Keller's original baking time was 60 minutes for a 9x13" dish but it took me 90 minutes to bake an 8x8" dish, so keep an eye for signs of doneness. Read my full review of Ad Hoc at Home at The Gastronomer's Bookshelf.
- 270g (1 cup + 2 tablespoons) whole milk
- 270g (1 cup + 2 tablespoons) heavy cream
- 100g (1/2 cup) sugar, divided into 2-50g portions
- 1 tablespoon vanilla paste or pure vanilla extract
- 4 slices of brioche or good-quality white sandwich bread from an unsliced loaf, crusts removed (each slice should be 18cm/7" long, 7.5cm/3" wide and 1.2cm/half-inch thick). Alternatively you could also use about 10 large slices about 9cm/3.5" square and 1.2cm/half-inch thick.
- 5 eggs
- 2 large ripe bananas
- about 120g (1/2 cup) clarified butter (I just used plain butter)
Toast the brioche or bread slices under a broiler until both sides are golden brown (I used the oven toaster).
In a mixing bowl, whisk the eggs lightly with the remaining 50g (1/4 cup) sugar. Pour in the hot milk mixture while whisking madly. Once combined, let cool (you can use an ice bath to speed it up). Pour a 6mm/one-fourth inch layer of this on the bottom of a 20cm/8" square baking dish (I used Pyrex).
If using square slices, soak each of the toasted bread slices in the custard remaining in the bowl for 1 minute, turning once in the middle. If using rectangular slices, the bowl won't be big enough to accommodate each slice, so pour the custard into another long baking dish that can accommodate a rectangular slice and soak as above. Carefully place each into the baking dish until the bottom is covered with a single layer of bread (4 slices if square, 2 slices if rectangular).
Cut the bananas in half crosswise, then each half into 3 pieces lengthwise. Cover the bread with the slices, then soak the rest of the bread (4 slices if square, 2 slices if rectangular) and cover the bananas with them. Soak any remaining slices of bread and use them to fill any gaps on the sides of the baking dish (standing up if needed be), then pour the remaining custard over the top. Cover with cling film pressed gently flush onto the surface. Set aside for 20 minutes, then remove the plastic wrap and place a piece of parchment over the top of the pudding, then cover the baking dish with aluminum foil.
Preheat the oven to 150°C/300°F. Place the baking dish in a larger pan and pour boiling water into the larger pan so water comes up 2/3 up the sides of the baking dish. Bake for about 90 minutes, checking at the 45-minute mark for doneness and again at 60 and 75 minutes. You'll know it's done if a knife inserted in the center comes out clean, or an instant-read thermometer inserted in the center is 82°C/120°F. Take the baking dish out of the water bath and place on a rack to cool (still covered). Refrigerate for at least 6 hours or up to 2 days.
Cut the bread pudding into 12 pieces and for each desired serving, remove a slice and scrape off any excess custard from the bottom. Heat about 1/4" clarified butter in a skillet over medium-high heat and lightly fry the bread pudding, cut side down. Reduce the heat to medium and brown about 2-3 minutes on each side. Serve with chocolate sauce (100g/3.5oz 70% chocolate, chopped, with a boiled mixture of 90g/6 tablespoons heavy cream and 44g/2 tablespoons light corn syrup poured over it, stirred until melted and smooth).